
Lumi-ONE V0.7 Deployment Guide
Release time:2025-03-17
Update description v0.7.0
Agent Function expansion : Agent now supports file import and publishing, improving workflow flexibility and efficiency.
Added Support for ARM environment deployment : ARM architecture is now fully supported, ensuring wider hardware compatibility.
Lumi page Enhancement : Lumi page now supports model configuration and maintenance functions to optimize user management experience.
This document will guide you through deploying Lumi_ONE on Linux/macOS and Windows systems. We’ll detail environment dependencies, installation steps, and solutions to common problems.
一、Environmental dependence
Before you start deploying Lumi-ONE, make sure your environment meets the following requirements:
- Docker : Version 19.03.0 or higher required.
- Operating System :
- Linux : Any common Linux distribution (e.g. Ubuntu, CentOS, Debian, etc.).
- macOS : macOS version 10.12 or later currently supports only Intel Chip.
- Hardware requirements:
- CPU: 8 cores or higher (Intel x86 CPU, Huawei Kunpeng CPU)
- Memory: 32GB or higher
- Hard disk space: 200GB or higher
二、installation steps
2.1 Loading Docker image to local (if downloading offline version)
2.1.1. Loading Docker image:
Execute the following command to load the Docker image:
sh load_tar.sh2.1.2. Note:
If you download an online version image, you do not need to perform this step manually. During deployment, the Docker image will be downloaded automatically.
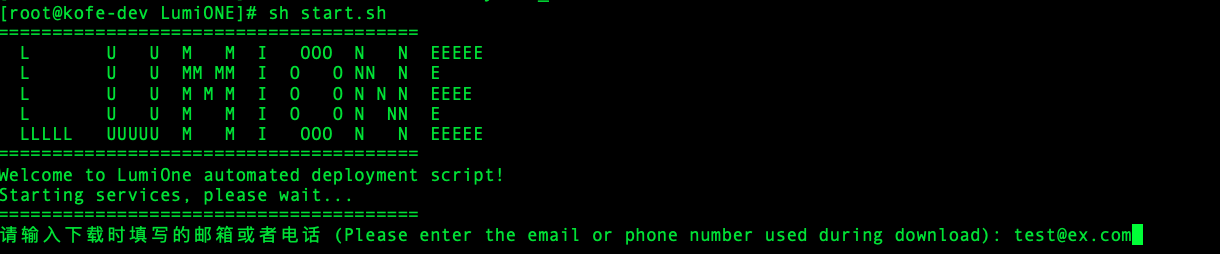
2.2 Enter your email address
During the installation process, you will be asked to enter the email address you entered when installing the package. The email address must be the same as the one entered when downloading the compressed package. If you forget your email address, you can re-enter the download page and fill it in.
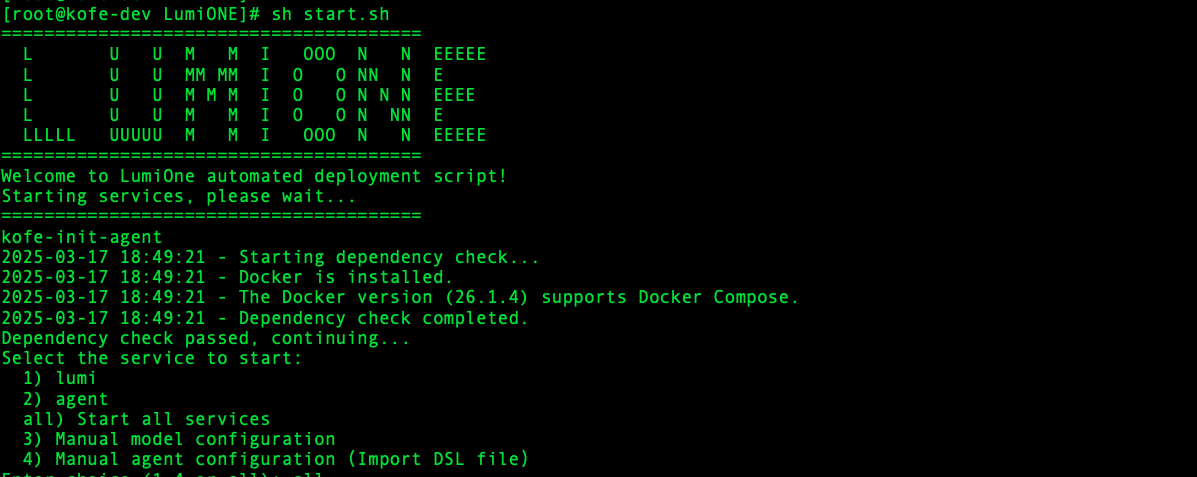
2.3 Execute the deployment script
Run the following command in the terminal to start the deployment process:
sh start.shA selection menu will pop up, prompting you to select a deployment category. You can select the following options as required:
- 1 : Select a single deployment product.
- 2 : Select another deployment product.
- all : Select deploy all products at the same time.
- 3 : Only models are added.
- 4 : Import the dsl file.
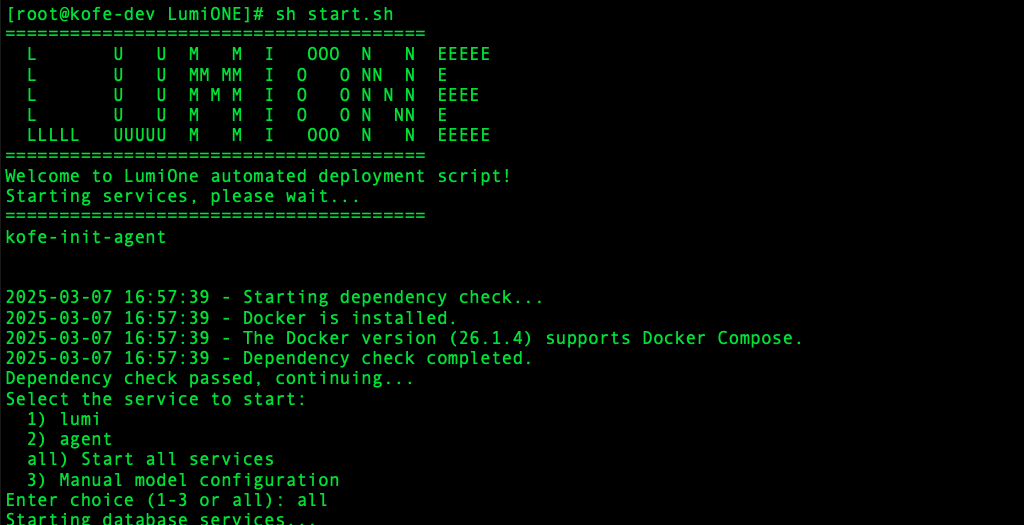
2.4 Configuring the model
After the deployment is complete, you will be prompted to configure the model.

The ‘deepseek:7b’ model is built into the system, you can choose to use this model, or you can choose other models according to your needs. If you need to configure the Open-API interface compatibility model, please provide the following information:
- API Key : The key used to authenticate API requests.
- Model Name : Name of the target model to be configured.
- Interface Address : indicates the target address of the API request.
2.5 Deployment complete
Once the configuration is complete, the deployment is successful. You can perform subsequent operations as required.
三、Add a new model
If you need to add additional models, follow these steps:
3.1 Executing the deployment script
Run the following command again to start the configuration process:
sh start.sh3.2 Select the new model
Select 3 from the menu to enter the new model configuration interface.
3.3 Configuring model information
Provide configuration information about the new model as prompted. Make sure you provide the correct model name, API address, and other necessary parameters.
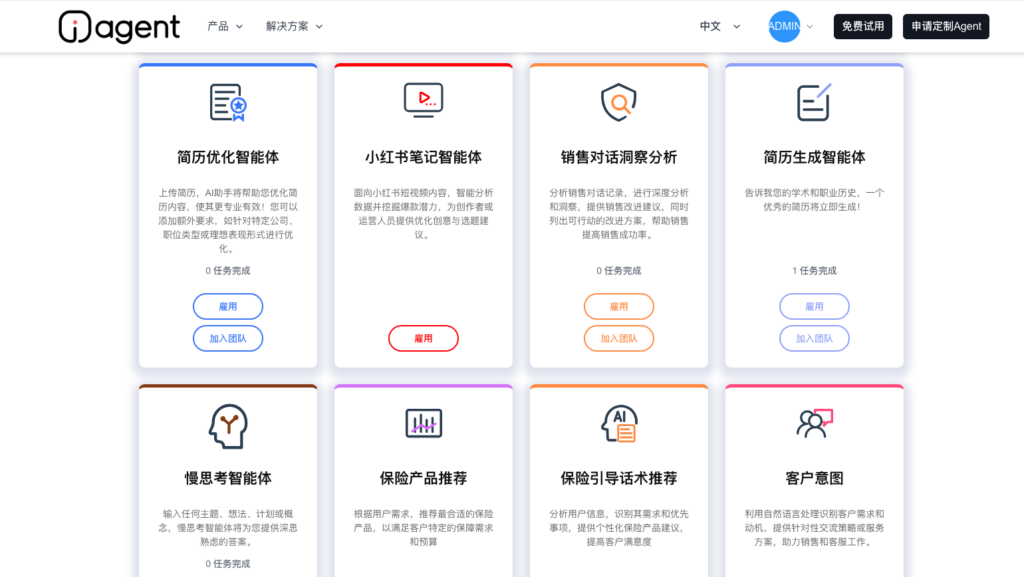
Agent Usage Instructions
List of available agents
- Contract review agent
- Resume Optimization Assistant
- Sales dialogue insights
- Resume generation
- Slow thinking agent
- Document review agent
- Job description generation
- Feedback analysis
- TRANSLATORS
- Prompt word optimization
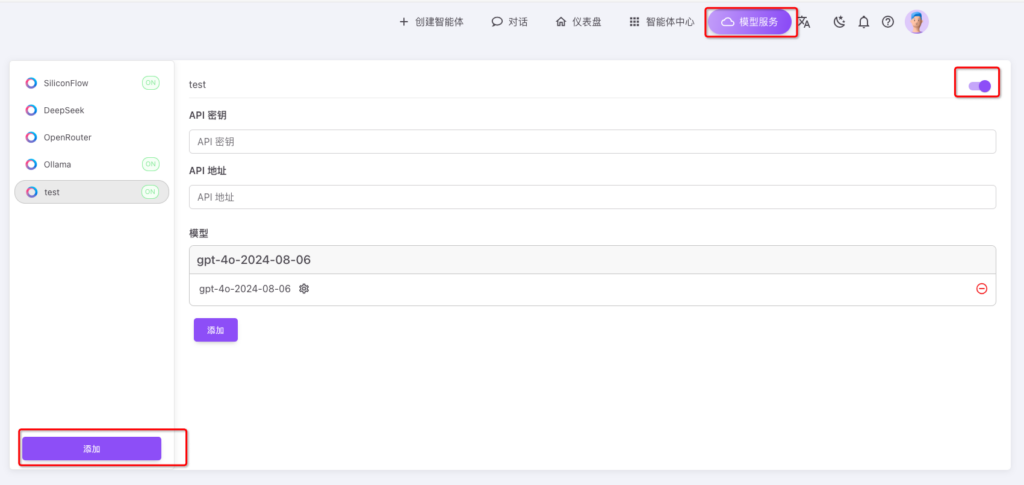
Lumi instructions
Model configuration
Lumi’s model needs to be added and configured in the Model Services section of the page.
四、Deployment in Windows environment
Windows Subsystem for Linux (WSL) is required to deploy Lumi_ONE on Windows. Here are the steps:
4.1 Installing Docker
First, you need to install Docker on Windows. Refer to Docker official document to complete the installation.。
4.2 Installing the WSL virtual machine
Use the following command to install WSL and select the appropriate Linux distribution:
wsl --install -d Ubuntu-20.04After successful installation, you can find the Ubuntu-20.04 icon in the Start menu.
4.3 Configuring Docker to enable Docker to run on the VM
According to the [Microsoft] official document configuration Docker, makes the WSL environment can also use a Docker.
After the configuration is complete, you can verify that docker is running properly by clicking on the Ubuntu-20.04 icon to enter the virtual machine and executing the ‘docker ps’ command.
4.4 Put the script into the WSL virtual machine
Ensure that the deployment script is transferred to the WSL virtual machine, and then the relevant deployment commands are executed within the virtual machine.
4.5 Windows Line Break problem
When executing a script on Windows, you may encounter the problem of line break exception, which can occur in two ways:
- The following error message is displayed: ‘./start_add_model.sh: line 2: $’\r’: command not found ‘
- An error message is displayed: ‘Line breaks are incompatible’. The following figure shows the difference between error reporting and normal execution:
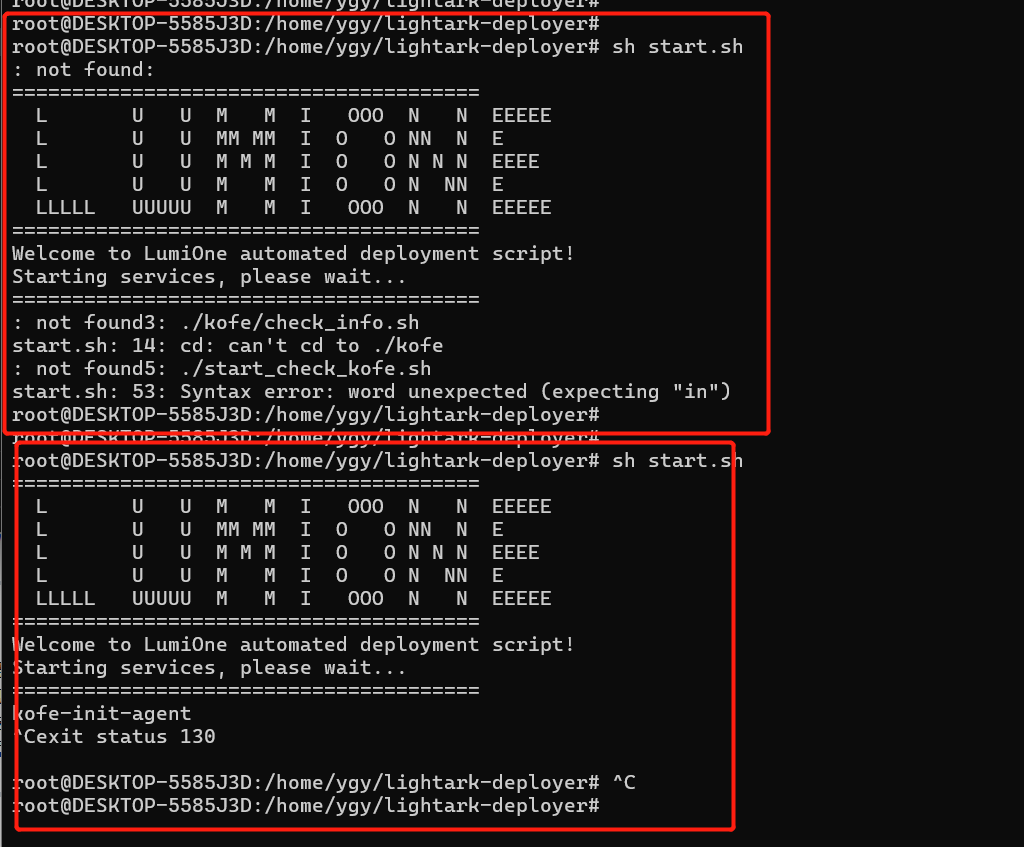
Solutions
Windows and Linux systems use different line breaks. Windows uses’ \r\n ‘(return + line feed), while Linux uses’ \n’ (line feed only). A common way to solve this problem is to use the ‘dos2unix’ tool to convert newlines in files.
五、Frequently Asked Questions (FAQ)
1. How to copy files from Windows to WSL virtual machine?
To copy files to WSL in Windows, you can use the following methods:
Method 1: Use File Explorer
- Open ** File Explorer ** and type ‘\wsl$’ in the address bar.
- Locate and go to your installed WSL distribution (such as Ubuntu).
- Locate the folder you want to copy to WSL.
- Drag and drop files from Windows to the WSL folder.
Method 2: Use ‘cp’ command
- Run the following command in the WSL terminal to copy the file from Windows to WSL:
cp /mnt/c/ path/file name /home/ user name/destination folder /
` ` `

For example, to copy the files of the Windows desktop to the '/home/username/' directory in WSL:
bash
cp /mnt/c/Users/ your user name /Desktop/ filename /home/ user name /
`Method 3: Remote-WSL extension via VS Code
- Install the ** Remote-WSL ** extension in VS Code.
- Open the WSL environment with VS Code, then drag and drop the file directly into the WSL folder.
2. Windows Newline problem (incompatible Windows newline in WSL)
If you encounter a newline problem in the WSL environment, you can resolve it using the following methods:
Method 1: Use the dos2unix tool
- In WSL, convert Windows-style line breaks (‘ CRLF ‘) to Unix-style (‘ LF ‘) using the following command:
dos2unix file name
` ` `

2. If you need to convert multiple files in batches, you can use:
bash
dos2unix *.txt
`
Method 2: Using Visual Studio Code (VSCode)
- Open the file in VSCode.
- In the lower right corner, click the current line break (such as’ CRLF ‘).
- Select ‘LF’ (Unix-style line break).
- Save the file for the change to take effect.
Method 3: Use the.editorconfig file
- Create an ‘.editorconfig ‘file in the root directory of the project with the following contents:
``ini [*] end_of_line = lf
This will force all files to use ‘LF’ (Unix-style line breaks).
Method 4 of 4: Use Another Editor
- Sublime Text : Select ‘Unix’ (‘ LF ‘) from ‘View >’ Line Endings’ and save.
- Notepad++ : Select ‘Edit’ > ‘EOL Conversion’ > ‘Unix (LF)’.
With the above methods, you can easily resolve the newline problem and ensure that you use appropriate UniX-style newlines in WSL or other Linux environments.
Organize md files
Formatting with FAQ added
** Reorganize the files **
I am reorganizing the md file of the Lumi_ONE deployment Guide, including fixing language and format issues, adding missing content, and adding answers to several frequently asked questions. This drives structure and clarity throughout the document.
Creating a Lumi_ONE guide
Overview Deployment steps
Scheduling deployment steps ** New FAQ entry added: **
3. How do I clean my data and redeploy it?
If you need to clean your data and redeploy Lumi_ONE, follow these steps:
- Run the following command on the terminal:
./clear.shThis will clean up the existing deployment data and prepare the system for redeployment.
- You can then redeploy the system by following the original deployment steps to re-execute the deployment script.
Please refer to the official documentation or contact our technical support for more frequently asked questions
Lumi_ONE V0.6 Deployment Guide
Release time:2025-03-10
This document will guide you through deploying Lumi_ONE on Linux/macOS and Windows systems. We’ll detail environment dependencies, installation steps, and solutions to common problems.
一、Environmental dependence
Before you start deploying Lumi-ONE, make sure your environment meets the following requirements:
- Docker:Version 19.03.0 or higher required.
- Operating System :
- Linux:Any common Linux distribution (e.g. Ubuntu, CentOS, Debian, etc.).
- macOS:macOS version 10.12 or higher.
二、Installation Steps
2.1 Loading Docker image to local (if downloading offline version)
First, open the terminal and go to the root directory of the Lumi_ONE project. Then, execute the ‘load’ script to load the Docker image:
sh load_tar.shIf you download the online version, you do not need to perform this step. The Docker image is automatically downloaded during the deployment.
2.2 Enter your email address
During the installation process, you will be asked to enter the email address you entered when installing the package. The email address must be the same as the one entered when downloading the compressed package. If you forget your email address, you can re-enter the download page and fill it in.

2.3 Execute the deployment script
Run the following command in the terminal to start the deployment process:
sh start.shA selection menu will pop up, prompting you to select a deployment category. You can select the following options as required:
- 1:Select a single deployment product.
- 2:Select another deployment product.
- all:Select deploy all products at the same time.
- 3:Only models are added.
2.4 Configuring the model
After the deployment is complete, you will be prompted to configure the model.

The ‘deepseek:7b’ model is built into the system, you can choose to use this model, or you can choose other models according to your needs. If you need to configure the Open-API interface compatibility model, please provide the following information:
- API Key:The key used to authenticate API requests.
- Model Name:Name of the target model to be configured.
- Interface Address:indicates the target address of the API request.
2.5 Deployment Complete
Once the configuration is complete, the deployment is successful. You can perform subsequent operations as required.
三、Add a new model
If you need to add additional models, follow these steps:
3.1 Executing the deployment script
Run the following command again to start the configuration process:
sh start.sh3.2 Select the new model
Select 3 from the menu to enter the new model configuration interface.
3.3 Configuring model information
Provide configuration information about the new model as prompted. Make sure you provide the correct model name, API address, and other necessary parameters.
四、Deployment in Windows environment
Windows Subsystem for Linux (WSL) is required to deploy Lumi_ONE on Windows. Here are the steps:
4.1 Installing Docker
First, you need to install Docker on Windows. Refer to Docker official document to complete the installation.。
4.2 Installing the WSL virtual machine
Use the following command to install WSL and select the appropriate Linux distribution:
wsl --install -d Ubuntu-20.04After successful installation, you can find the Ubuntu-20.04 icon in the Start menu.
4.3 Configuring Docker to enable Docker to run on the VM
According to the [Microsoft] official document configuration Docker, makes the WSL environment can also use a Docker.
After the configuration is complete, you can verify that docker is running properly by clicking on the Ubuntu-20.04 icon to enter the virtual machine and executing the ‘docker ps’ command.
4.4 Put the script into the WSL virtual machine
Ensure that the deployment script is transferred to the WSL virtual machine, and then the relevant deployment commands are executed within the virtual machine.
4.5 Windows Line Break problem
When executing a script on Windows, you may encounter the problem of line break exception, which can occur in two ways:
- The following error message is displayed: ‘./start_add_model.sh: line 2: $’\r’: command not found ‘
- An error message is displayed: ‘Line breaks are incompatible’. The following figure shows the difference between error reporting and normal execution:

Solutions
Windows and Linux systems use different line breaks. Windows uses’ \r\n ‘(return + line feed), while Linux uses’ \n’ (line feed only). A common way to solve this problem is to use the ‘dos2unix’ tool to convert newlines in files.
五、Frequently Asked Questions (FAQ)
1. How to copy files from Windows to WSL virtual machine?
To copy files to WSL in Windows, you can use the following methods:
Method 1: Use File Explorer
- Open ** File Explorer ** and type ‘\wsl$’ in the address bar.
- Locate and go to your installed WSL distribution (such as Ubuntu).
- Locate the folder you want to copy to WSL.
- Drag and drop files from Windows to the WSL folder.
Method 2: Use ‘cp’ command
- Run the following command in the WSL terminal to copy the file from Windows to WSL:
cp /mnt/c/ path/file name /home/ user name/destination folder /For example, to copy the files of the Windows desktop to the ‘/home/username/’ directory in WSL:
cp /mnt/c/Users/ your user name /Desktop/ filename /home/ user name /Method 3: Remote-WSL extension via VS Code
- Install the ** Remote-WSL ** extension in VS Code.
- Open the WSL environment with VS Code, then drag and drop the file directly into the WSL folder.
2. Windows Newline problem (incompatible Windows newline in WSL))
If you encounter a newline problem in the WSL environment, you can resolve it using the following methods:
Method 1: Use the dos2unix tool
- In WSL, convert Windows-style line breaks (‘ CRLF ‘) to Unix-style (‘ LF ‘) using the following command:
dos2unix 文件名- If you need to convert multiple files in batches, you can use:
dos2unix *.txtMethod 2: Using Visual Studio Code (VSCode)
- Open the file in VSCode.
- In the lower right corner, click the current line break (such as’ CRLF ‘).
- Select ‘LF’ (Unix-style line break).
- Save the file for the change to take effect.
Method 3: Use the.editorconfig file
- Create an ‘.editorconfig ‘file in the root directory of the project with the following contents:
   [*]
   end_of_line = lf
This will force all files to use ‘LF’ (Unix-style line breaks).
Method 4 of 4: Use Another Editor
- Sublime Text:Select ‘Unix’ (‘ LF ‘) from ‘View >’ Line Endings’ and save.
- Notepad++:Select ‘Edit’ > ‘EOL Conversion’ > ‘Unix (LF)’.
With the above methods, you can easily resolve the newline problem and ensure that you use appropriate UniX-style newlines in WSL or other Linux environments.
Organize md files
Formatting with FAQ added
Reorganize the files
I am reorganizing the md file of the Lumi_ONE deployment Guide, including fixing language and format issues, adding missing content, and adding answers to several frequently asked questions. This drives structure and clarity throughout the document.
Creating a Lumi_ONE guide
Overview Deployment steps
Scheduling deployment steps ** New FAQ entry added:
3. How do I clean my data and redeploy it?
If you need to clean your data and redeploy Lumi_ONE, follow these steps:
- Run the following command on the terminal:
./clear.shThis will clean up the existing deployment data and prepare the system for redeployment.
- You can then redeploy the system by following the original deployment steps to re-execute the deployment script.
Please refer to the official documentation or contact our technical support for more frequently asked questions.